Programming with MiRoCODE (Blockly)
Overview
MiRoCODE is a visual programming environment built on Blockly, used to control MiRo through drag-and-drop blocks. It is one part of a larger system that also includes a Python interface for more advanced programming. This section focuses on the Blockly-based approach.
Blocks and canvas
Programs are constructed by connecting drag-and-drop blocks on a canvas and running them either in simulation or on a physical robot. Each block represents a specific instruction or piece of logic. Blocks must be connected correctly to form a valid program structure. MiRoCODE blocks fall into three main categories, each serving a different purpose in a program.
1. Starter blocks
Starter blocks define where execution begins. Every independent program flow must start with one.
Starter blocks include:
- Program Start — main entry point of execution
- Function blocks — reusable blocks of logic, optionally returning values
2. Action blocks
Action blocks control what MiRo does. They are executed in sequence, typically from top to bottom.
They are split into two types:
Immediate actions
These trigger an action without defining how long it lasts.
Example:
Start Moving [Forwards] [Slow]
Execution continues immediately to the next block unless stopped or modified.
Duration-based actions
These run for a defined amount of time or distance and block further execution until complete.
Example:
Move MiRo [0.3] metres
These are useful when precise movement control is required.
3. Logic and data blocks
These blocks do not directly control MiRo. Instead, they control decision-making, calculations, and data flow within a program.
They include:
- Variables
- Arithmetic operations
- Comparisons
- Conditional statements (e.g. if/else logic)
- List operations
- Function inputs and outputs
These blocks are typically used to build behaviour that adapts to sensor input or changing conditions.
Execution model
MiRoCODE executes programs sequentially within each flow:
- Blocks run from top to bottom
- Starter blocks define independent execution threads
- Action blocks control behaviour over time
- Logic blocks determine how decisions are made
Understanding this structure is key to building reliable programs.
Running a program
Once a program is built:
- Click Play in simulator to test in MiRoCloud
- Click Play on robot to run on physical MiRo (if available)
Output and status messages appear in the console window.
Built-in examples
MiRoCODE includes example programs to demonstrate core concepts and common behaviours. These can be used as reference material or starting points for your own work and include:
- Simple output sequences (e.g. number generation)
- Sensor-driven behaviours (e.g. clap response)
- Movement patterns and scripted behaviours
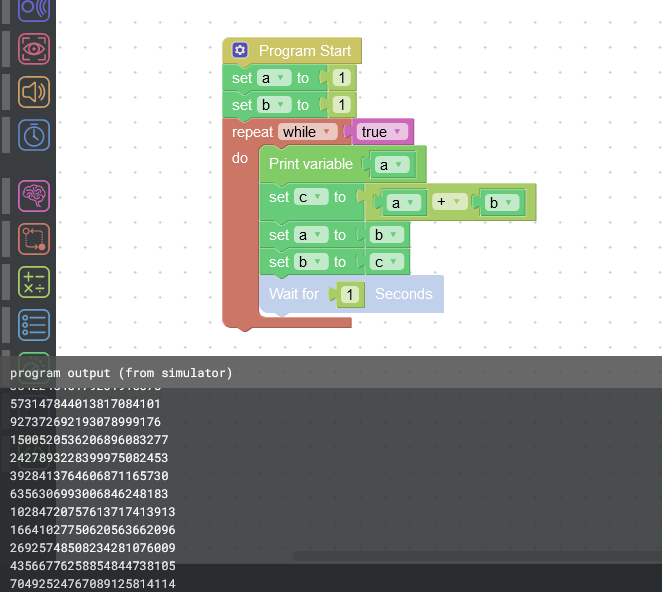
Fibonacci numbers
This example demonstrates basic program structure and output handling in MiRoCODE (Blockly).
When the program is executed, MiRo generates and prints a sequence of Fibonacci numbers to the console.
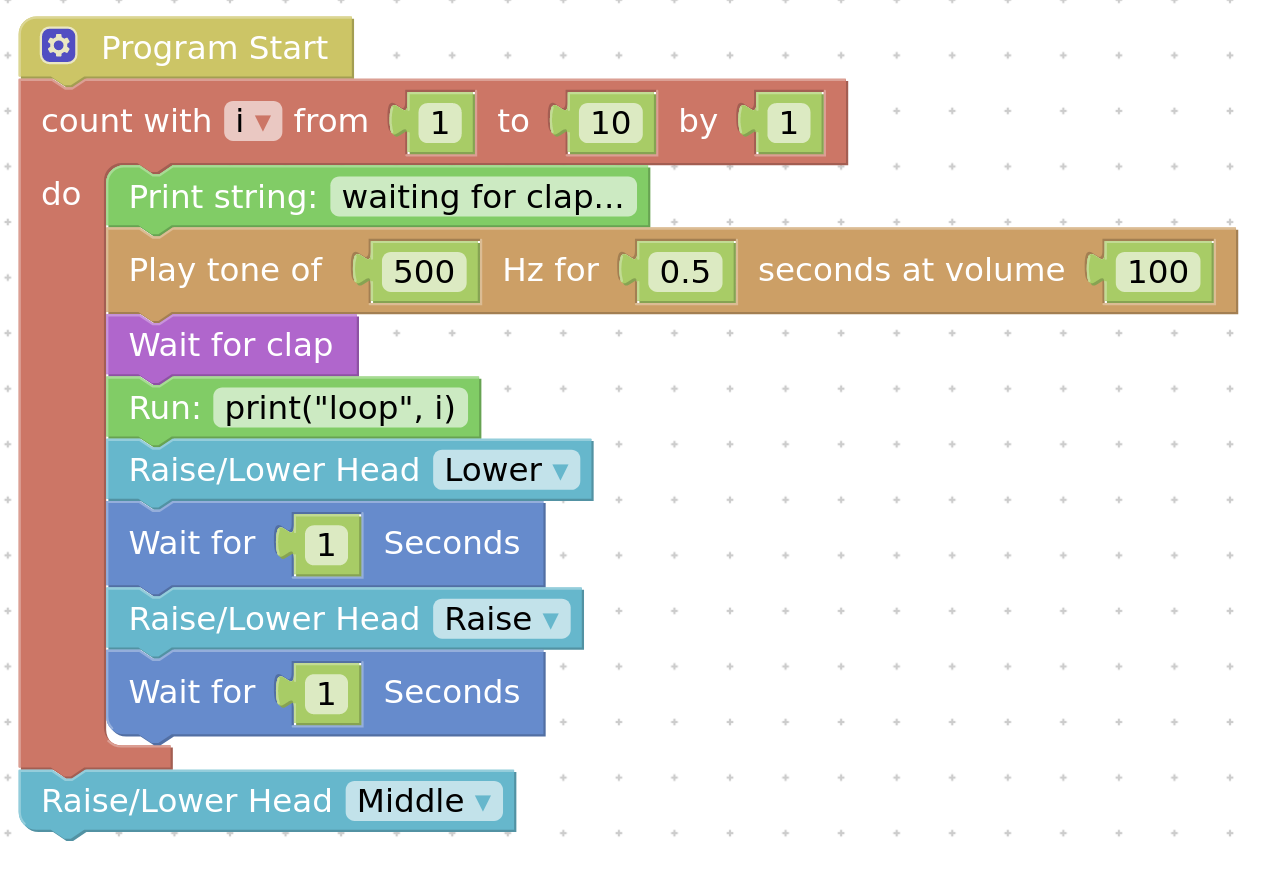
Clap then nod
This example demonstrates how MiRo can respond to sensor input in real time.
When a clap is detected (simulated using the Clap button in the interface), MiRo responds by moving its head in a nodding motion.
Next are a set of exercises to try things out for yourself.